Environment setup
This document will lead you through the setup so one can run the code on a local machine.
Binder
Binder is a service in which lets you use computational resources from big tech companies free of charge and without any registering or setup. Click here to use a Binder instance where everything is set up for you.
Please have in mind that these machines are free of charge and therefore the resources are quite limited and some computations will not work because we will rely on some heavy computation.
Todo
Currently SuperCollider is not working in this environment as this requires a headless version of SuperCollider in Docker which is not trivial at this point.
If somebody knows how to set this up please open a Pull Request.
Repository setup
To copy the course material to the local machine we will use git. For the install procedure please refer to the official website.
After one has setup git we now need to clone the repository by opening a new shell window and head to a directory in which you want to copy the course material and execute the command
git clone https://github.com/capital-G/musikinformatik-sose2021.git
If you know what SSH, have a GitHub account and you want to participate in the creation of the course one should use SSH instead so the command becomes
git clone git@github.com:capital-G/musikinformatik-sose2021.git
Now as we have cloned the course material to a local directory we want to switch to the directory which we just created by cloning the repository
cd musikinformatik_sose2021
Convention
We will refer to this folder as the root folder of the repository. Most commands will be executed in this folder and we will always work relative to this path.
Please make sure if you e.g. re-start Jupyter Lab or you activate the virtual environment you are in this directory before entering the commands.
SuperCollider setup
Please refer to the SuperCollider download page for the install instructions of SuperCollider.
When working with macOS we assume that you have installed SuperCollider in /Applications/SuperCollider so
the following command should yield the version number of SuperCollider
/Applications/SuperCollider.app/Contents/MacOS/sclang -v
If you have installed SuperCollider in a different location you can set the environment variable SCLANG_PATH to the
path where your sclang executable is located.
Python setup
Installing Python
Please make sure you have installed Python 3.8, pip3 and virtualenv on your machine. A good guide on how to install Python on your machine can be found here.
Warning
Please refrain from Python 3.9 as this is not supported by Tensorflow yet. The default homebrew setup will install the latest Python version which is 3.9 which will not work for our experiments. If you use Homebrew on macOS you can install version 3.8 by executing
brew install python@3.8
Installing virtualenv
Python is a language that relies on libraries - e.g. the parsing of MIDI files is not build-in to the language but there is a collection of MIDI libraries that allows Python to work with MIDI files. It turns out that it is a good practice to not mix too many libraries as they are maybe not compatible to each other - maybe library A relies on version 0.2 of library B but library C relies on version 1.2 of library B - welcome to dependency hell.
The solution to this is to create an isolated environment for each project - so the clashing of incompatible versions does not occur. It is also possible to determine which version of Python we want to use for our project which is relevant to us.
virtualenv provides us with such a functionality and we can install it by running
pip3 install virtualenv
in a terminal.
We use pip3 for installation of virtualenv which is a
package manager for python libraries.
After a successful installation please check that you have the following
python3 --version
# Python 3.8.x
# macOS users who installed python 3.8 via homebrew should check
# /usr/local/opt/python@3.8/bin/python3 --version

pip3 --version
# pip 21.0.1 from /usr/local/lib/python3.8/site-packages/pip
# just about any pip3 version will be fine

virtualenv --version
# virtualenv 20.4.2 from /usr/local/lib/python3.8/site-packages/virtualenv/__init__.py
# just about any virtualenv version will be fine - make sure that it refers to your
# python3 folder from above and not to e.g. python2
Creating a new virtual environment
After we have installed virtualenv (see Installing virtualenv) we now use it to create a new virtual environment for our project.
Go to the root folder of the repository (see Repository setup) with a shell and execute
the command in this folder to create a new virtual environment in the folder venv
virtualenv venv
Warning
macOS users who installed python 3.8 with homebrew should instead call
virtualenv --python=/usr/local/opt/python@3.8/bin/python3 venv
Activating the virtual environment
After we have installed the virtual environment it is now time to activate it so we install the necessary libraries (such as e.g. Jupyter Lab) to the isolated environment and not to the global Python installation on your machine.
Assuming you are in the root folder of the repository (see Repository setup) and created a virtual environment (see Installing virtualenv) it is as simple as executing the command
# on linux/macOS
source venv/bin/activate
# on windows
.\venv\Scripts\activate
After the virtual environment has been successfully activated something (venv) will
be shown in the command prompt.
Installing dependencies
After we have activated the virtual environment (see Activating the virtual environment) we can now install all necessary libraries for our project by running.
pip3 install -r requirements.txt
Start Jupyter Lab
After we have installed all necessary libraries (see Installing dependencies) it is now time to start Jupyter Lab which is a coding environment for our browser in which we can code Python and SuperCollider.
Please make sure you have activated the virtual environment (see Activating the virtual environment) and execute the command
jupyter lab
To shut down the Jupyter Lab server enter the keyboard combination of <Ctrl> + c
in the shell window in which the Jupyter server is running.
A prompt will appear in which one has to verify that one wants to shut down the
server by entering y.
Documentation
Note
This is only an optional step if you want to participate in improving the course material.
In order to build the documentation locally one also needs to install its dependencies by executing the following command in the root directory of the repository (see Repository setup)
pip3 install -r requirements-docs.txt
After this the documentation can be build by executing the shell script
./build_docs.sh
from the root directory of this repository.
Convention
If you want to open the documentation in a browser after it has been build you can set the environment variable
export OPEN_BROWSER_AFTER_TEST=true
when using the ./build_docs.sh script.
Remember that this has to be set every time you open a shell or you add it to your ~/.zshrc or else.
Setup via Docker
Alternatively, if one has Docker installed, one can also run the notebooks in a docker container by executing
docker build -t musikinformatik . && docker run -p 8888:8888 -v ${PWD}:/home/musikinformatik musikinformatik
while being in the root directory of the repository and click on the appearing link.
Todo
Currently it is difficult to run SuperCollider in an headless environment such as Docker, therefore SuperCollider is omitted in the docker image.
Any help on this is appreciated.
Docker Compose
If you have docker-compose installed on your machine you can also simply run
docker-compose up
and access the jupyter notebook via http://localhost:8888.
Updating and working with the repository
The course material is stored and distributed via git. As there are constantly updates on the course material there will be conflicts when we have worked locally on a notebook. This is because git does not know how to resolve the local changes with the remote updates - this is commonly known as merge conflicts.
Probably the best way is to save the notebook on which you work locally to a new notebook - this can be done by clicking on the Save Notebook As … button under the File menu in the upper left corner of Jupyter Lab.
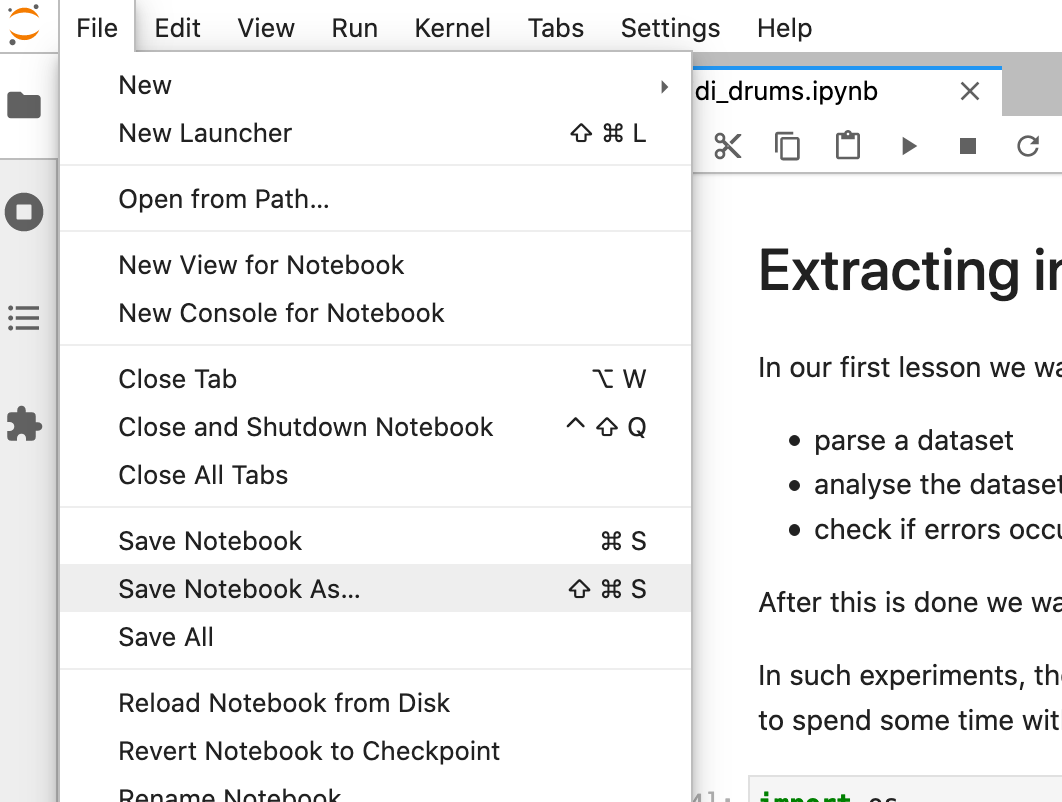
Save a notebook under a new name to avoid any problems when updating the course material.
Updating the course material
Assuming that you have saved all the changes you want to keep in a new notebook and you are in the root repository of repository, the following commands will update the course material
# remove any changes from existing files
git reset --hard
# get newest changes
git pull
It may be necessary that new dependencies got introduced during the update, so its always a good idea to quickly install any new dependencies - see Installing dependencies on how to do this.